Visually reading magnetic stripes with iron oxide
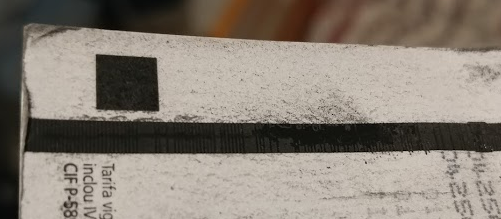
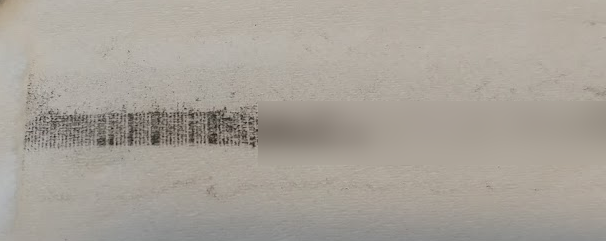
On 03/12/2017 I attempted to read a magnetic card strip using iron oxdie (FeO) powder created by decomposing steel wool with a blowtorch. At the time, I had not way of getting the powder fine enough, and was girding it by smashing it between various construction tools. As you can see from the image below, the attempt was a failure since the particle weren’t small enough and the resolution was terrible. A few months ago, I had gone to IKEA and found a pestle and mortar in their kitchen section, this was the perfect tool to grind my powder to a fine dust that might just work, so I bought one.
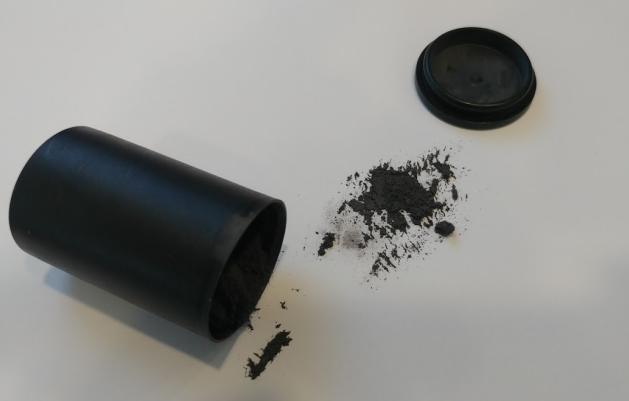
A few days ago, I finally had some time over the weekend to test my new method. I started by taking some steel wool, fluffing it up (so it burned well), adding it to a pot and decomposing it to iron oxide with a blowtorch. After I was satisfied with the amount of iron oxide created, I started to grind it in the pestle and mortar for approximately 20 minutes to 1/2 and hour (the more you grind, the better). After the oxide was ground to satisfaction, I pinched out by hand some of the bugger pieces that did not grind well, and set half the powder aside. I took part of the mixture and added it to a small shot-glass of with water, mixed it well, and then filtered the liquid through a paper towel. There are two reasons for adding the water and filtering. The first being, that adding the powder to the liquid, allows the fine partials to be suspended in the solution and gravitate with minimal friction towards the magnetic fields of the stripe. The second reason, is that larger particles have the chance to either get stuck in the filter, or sink to the bottom, that way I get the finest particles I can. For the other half of the powder I had set aside, I put that in a plastic film canister with a magnet underneath (to minimize dust) for later.
To use the solution I prepared, I made a small trough out of aluminium foil (90mm x 20mm x 10mm) and proceeded to stir and pour the solution into it. The trough is deep enough to allow the submersion of the magnetic stripe, and allow the solution to wrap around it. I took an unused card I had laying around and dipped the top half of the card in the solution, while waving it around a bit. After a few second, I took the card out and inspected it for quality. I decided it was good enough and put it out to dry in the air, in a protected place (using a hair dryer is also an option, just don’t melt the card!).
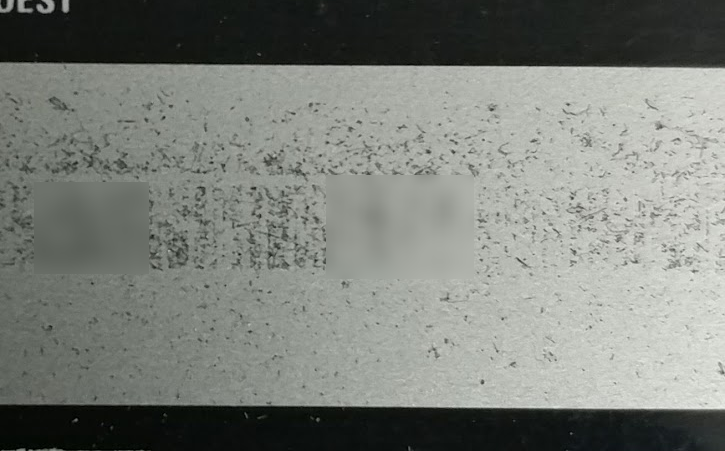
It took the card a good 5-10 minutes to dry out completely, but when it did, it was magnificent. All the magnetic fields on the magnetic stripe were visible to the naked eye, it was beautiful. After I got over myself, I took some pictures of the card with my phone and DSLR and started to look into it deeper (I’m no professional photographer, and I don’t really have the right lenses for the close pictures I was taking).
I did the same process on another card I had around, but this time, I decided to imprint the magnetic stripe by putting the card magnetic stripe down onto some tissue paper. Keeping the card still enough while placing and removing, allows the metal oxide powder to leave traces on the tissue paper. I did not expect this to work to well, but to my surprise, the contrast of the white tissue paper and the black oxide really enhanced the visibility of the lines to the naked eye, so much so, that I decided to decode the imprint.
Now, that I had the magnetic fields all visible, it was time to decode the data. When I first attempted this experiment back in 2017, I had collected a number of of sources on the encoding and layout of the magnetic stripes. One source I kept referring to was Card-O-Rama: Magnetic Stripe Technology and Beyond published in Phrack Magazine back in 1992.
To make things short, there are 3 tracks on a magnetic stripe, the 1st and 3rd tracks are encoded at 210 bits-per-inch and the 2nd track (the middle track) is encoded at 75 bits-per-inch. Due to the density of the 1st and 3rd tracks, it is harder to decode them compared to the 2nd track with the resolution the iron oxide provides (at least mine), furthermore, tracks 1&3 were not presend on both cards I attempted to decode.
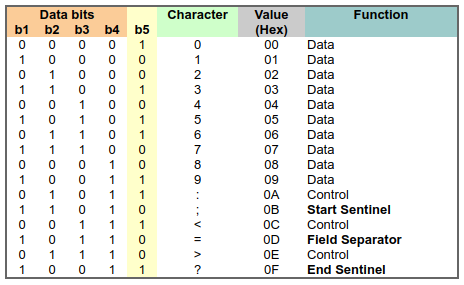
Back on the 2nd track, the data is encoded in BCD Data Format and has 4 bits per character with 1 parity bit. It’s also worthy to note that the data is read LSB first (bit-0). The tack itself, starts with a some clocking bits (basically a bunch 0s) then comes a Start Sentinel (SS) character, followed by some data, a Field separator (FS) character, more data, and an End Sentinel (EF) character. After the last End Sentinel there is some Longitudinal Redunancy Check (LRC) that is not really interesting. The following table and figure describe the BCD format, and the second track layout.

Now I know what to expect on magnetic stripe and how to decode it, it is time to do it. I was contemplating about using OpenCV to detect the line, map them to 1s and 0s and then have it decode itself, but I think I’ll leave that as a later project, while I decode the stripe manually. I will also give a small preamble about the card, the card I used for testing is not a regular banking card, it is a gift-card for a supermarket chain that is scanned into the POS system just like a credit card. It has a card-number, expiry date and CVV, it is also accepted in many other stores (90+), and is backed by a large credit company. I opted to use this card just in case I damage the stripe, it’s not a critical card.
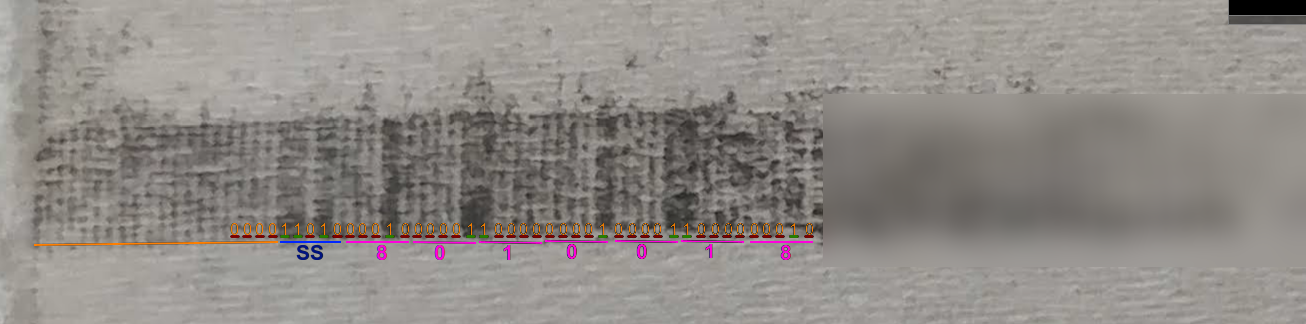
Opening the image of the imprint in a photo editor (I used Pinta) I started marking some of the leading clocking bits width (underlined in ORANGE), this allowed me to get a feel for what is the width of one bit on the stripe. After I got the cloking bits done, I marked out all the 1s and 0s I could find, I used a RED bar to indicate a 0 and a GREEN bar to indicate a 1). After I had the values of the bits, I grouped them into 5 (4 bits + 1 parity) and started looking for the Start Sentinel (SS) after the clocking bits, as seen in the image below, there is a pattern on 11010 right after the clocking bits (marked in BLUE). The next group of 5, according to the BCD table was an 8, the next, a 0 and so on. These are the data bits, and are the first digits of the card number (marked in PINK), as can be validated validated by looking at the front of the card.

I could go on and decode the full number right here on my blog, or I can keep the rest of the numbers to myself ;), but for a project that I had in my head since 2017, I am satisfied with the result. In the future, I may complete a script I was working on for automated decode of the stripe from an image, but I really don’t know why I need it, I can just read it with my eyes.
I did also reveal the magnetic stripe on a paper bus/train ticket, image posted below if you are interested. Thank you for reading. and see you in my next entry.