Creating a Debian 12 (Bookworm) live USB w/ serial support
UPDATE 19/09/2024: Added the ISO mount process and the recursive copy to the flash drive I mistakenly ommited. Thank you Josep.
In my project of replacing the QNAP operating system (QTS/QuTS) I needed to create a bootable Debian USB drive to boot a live environment. While under normal circumstances this is as simple as writing the ISO file to a flash drive, I needed to edit the boot and kernel configuration/parameters to allow booting over the serial console. This post is just part of my ongoing documentation on the process.
Preparing Live Media
Requirements:
- Debian 12 (Bookworm) live image.
- 2GB USB flash drive
I started by plugging in the flash drive to my laptop and locating the device using lsblk. I then partitioned the disk with a single partition using sudo sgdisk -g -n1:1M:0 -t1:EF00 /dev/sd<X>[man] the EF00 is important as it sets the partition GUID to “EFI System” which allows the target machine detect the partition as bootable. (A note for Windows users, Windows systems will not show a disk partition marked as EFI in “My Computer” and will not mount or allow browsing/editing files under the EFI partition.) Next was to format the partition to FAT32 required for UEFI booting using sudo mkfs.fat -F32 -I -n DEB12SERIAL /dev/sd<X><N>man. Once the device was formatted, I mounted it (sudo mount /dev/sd<X>1 /mnt)[man] as well as the Debian ISO image (mkdir /tmp/debiso, sudo mount -o loop <iso-path> /tmp/debiso/) and copied over the content of the ISO image sudo cp -a /tmp/debiso/* /mnt/[man], I then executed a sync[man] to make sure all data was written, once copied, unmount the the ISO using sudo umount /tmp/debiso (quick tip: If you want to know how much data is left to sync from memory, use grep Dirty /proc/meminfo).
On a side note, the debian and firmware directories will fail to copy as they are/contain symlinks that are not supported on FAT32 filesystem, this will not affect my current installation or the live environment since I am performing a manual install and not using the installer, however, I do not recommend using this flash drive with the standard Debian installer, as it may? can?, will? cause the installer to fail or misbehave.
When preparing a normal installation media, this would be the end of preparations, however since the QNAP TS-473A does not have any built-in GPU, no screen or video output can be used for the installation process. I could go out and buy a GPU and install it in one of the PCI slots on the NAS and use a monitor, but that adds extra cost, heat and power consumption to the NAS, and if I take the GPU out after installation, I have no quick way to access my NAS in a emergency. For those reasons, I have modified my QNAP and added a serial port so I will use the serial port instead, and it only requires a few tweaks to the installation media.
Two files need to be edited on the installation media, the first is /boot/grub/config.cfg, which contains some basic setup instructions for GRUB. First, the output mode for GRUB needs to be set up to use the serial console. This can be achieved by changing terminal_output from gfxterm (which is a graphical terminal emulator) to serial and adding a line below to set the input method too: terminal_input serial. I then also added the line serial -u 0 -s 115200 -w 8 -r no -t 1[man] above terminal_output to instruct grub to initialize serial unit 0 and use the standard 8N1@115200 serial settings. This takes care of GRUB itself to show up on the serial console.
The second file that needs to be edited is /boot/grub/grub.cfg. This file contains the GRUB configuration for the different menu options and OS boot instructions. I edited the first menu entry Live system (amd64) and under the linux directive, I removed the quiet and splash kernel command line parameters. I then added at the end of the line the parameter console=tty0 console=ttyS0,115200 to instruct the kernel to output to the serial console too. I also renamed the menu entry from Live system (amd64) to Live system (amd64) - Serial to distinguish it from other boot media I have lying around. Once everything was completed, I ran a second sync and unmounted the filesystem (sudo umount /mnt)[man].
Using the live media
Once everything is ready, booting into the live environment is straight-forward as with any machine. The flash drive is inserted into the target machine and then a connection needs to be made to the serial port to the target. I first tested the USB stick on a VMWare virtual machine to make sure that everything was configured correctly. Once I was sure it would work, I continued to the real hardware.
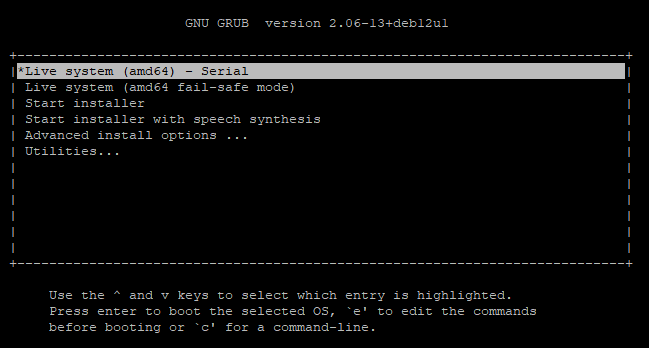

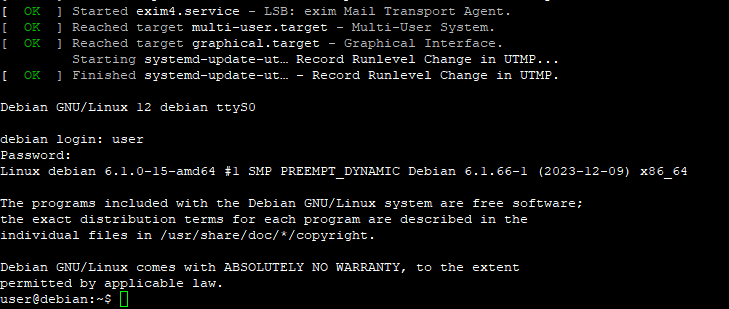
I powered up the NAS and waited for the BIOS banner to appear, I entered the BIOS using the delete key and under the Save & Exit tab, I selected my flash drive under the Boot Override section, and just like magic, GRUB was loaded and was working over the serial console. I selected the menu entry I changed earlier (Live system (amd64) - Serial, this is also the default selection) and was pleased to see the Linux banner appear and kernel messages fly by.
One small difference to note from the normal Debian live CD is that the console does not perform an automatic login to the shell since we are not on the expected virtual console. A manual login can be done using the username/password user/live. Once logged in, sudo su can be used to gain root privileges for continuing the installation.