Circumventing unRAIDs physical USB requirement on VMs
unRAID requires a physical USB to boot and I hate that. It all started when I decided to upgrade my home server, I’m currently looking for a better solution to manage my growing media and home services storage requirements. I’m considering NAS software like unRAID, TrueNAS, or OMV to properly handle storage, either by replacing Proxmox or by running it as a virtual machine with pass-through for a PCI HBA.
While I haven’t chosen the specific software yet, this post is not about selecting the best software that meets my needs, comparing unRAID to other NAS options, or engaging in piracy. This post is about my frustration which lies in the fact that unRAID requires a USB flash drive as its boot device. It’s an inconvenience and I prefer to not tie my entire infrastructure to specific hardware and deal with the potential issues of relying on a USB drive. I also find it cumbersome to transfer licenses and backup configurations compared to snapshoting and restoring the OS disk.
To avoid making non-standard modifications to the unRAID image, that may break in a system update, I have decided not to pursue the route of booting from an HDD through binary patching or other modifications to the internal filesystem. Instead, I have opted to emulate the USB device that is passed through to the testing VM using the Linux kernels USB gadget API. Fortunately, I have some prior experience with the USB gadget API from previous projects, albeit undocumented ones in this blog (I’m working on that).
Creating an unRAID backing file
Since I have decided to use the Linux USB gadget API, I’ll need some sort of image file with unRAID installed to it to act as the storage of the flash drive. This is the so-called “backing file”. This backing file will be in the form of an image file, similar to a RAW format VM disk. To create the image file, I have two options:
Running the USB gadget setup and passing the device to a Windows VM: once set up, the unRAID USB creator can be used to flash the device. However, since I didn’t have a Windows VM readily available on the hypervisor and didn’t want to compile the entire gadget API twice to make it work on my laptop, this option did not seem feasible for me.
Creating the USB image under Linux: Considering the limitations of the first option, I decided to manually create the USB image under Linux. I gathered information from the unRAID Wiki, specifically the section on USB Flash Drive Preparation, which provided some information on creating the image file.
By opting for the second approach, I was able to proceed with creating the USB image without relying on a Windows VM or the need for additional compilation.
Looking at the unRAID utility, it fetches a list of branches from the URL https://unraid-dl.sfo2.cdn.digitaloceanspaces.com/creator_branches.json. Querying this URL responds in a JSON list of dictionaries. Each dictionary contains information about a branch, including the branch name and a URL to fetch unRAID versions associated with that branch. Currently, there are two options available: release and next. In my case, I used the URL of the release branch.
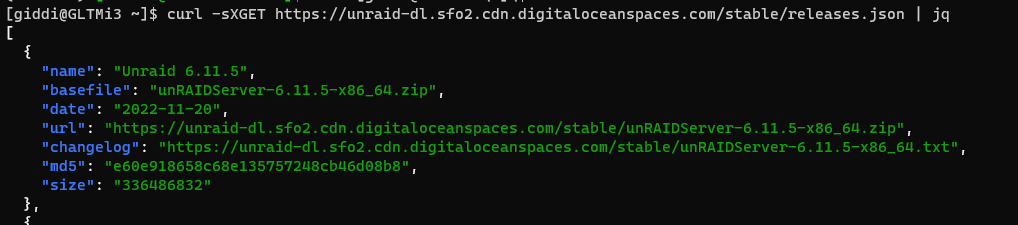
To retrieve the versions within the chosen branch, I queried the URL associated with the release branch (https://unraid-dl.sfo2.cdn.digitaloceanspaces.com/stable/releases.json).
This URL returns another list of dictionaries, with each dictionary providing details about a specific version of unRAID. The information includes the version name, release date, zip download path, and an MD5 checksum for integrity checks (it also has a link to the release notes).
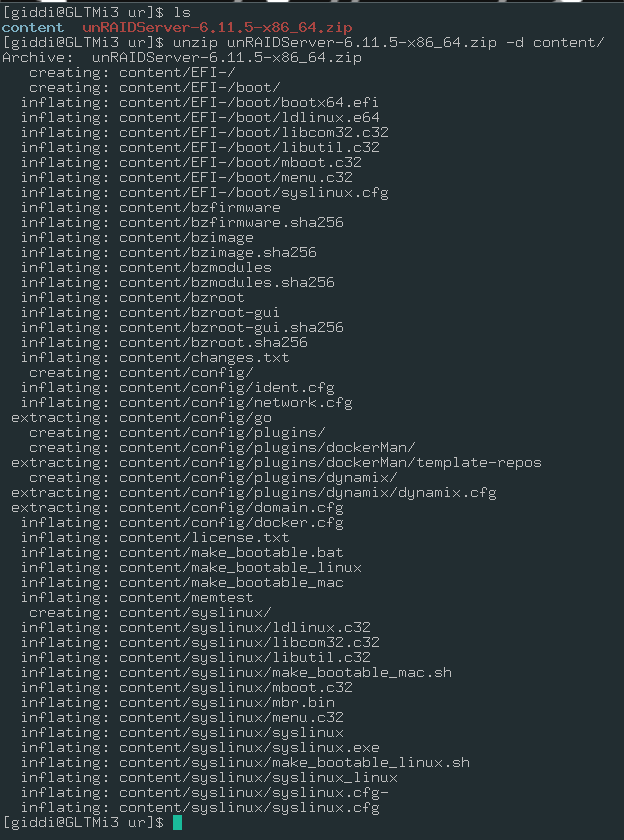
After downloading the latest zip file I extracted its contents to a directory, Based on the information provided in the unRAID Wiki and the contents of the extracted files, it appears that the contents are meant to be used in the boot directory of the flash drive.
The files syslinux/mbr.bin and EFI-/boot/bootx64.efi were also noticeable, indicating support for both legacy and UEFI booting. This suggests that the unRAID boot setup supports multiple boot modes. Additionally, since there is UEFI support, it implies that the flash drive needs to be formatted as a FAT32 partition, adhering to the UEFI standard.
Here’s the breakdown of my plan:
- Start by creating an empty disk image.
- Partition the image and format it to FAT32.
- Copy the necessary files to the newly formatted partition.
- Optionally, make any required configuration changes.
- Utilize syslinux to write the Volume Boot Record (VBR) and Master Boot Record (MBR) to the disk image.
To begin, I will create a proper working directory and download the zip file:
mkdir -p unraidSetup/temp && cd unraidSetup
wget https://unraid-dl.sfo2.cdn.digitaloceanspaces.com/stable/unRAIDServer-6.11.5-x86_64.zip
To create the image file and format it, I decided to go with a 2GB size file. This size allows for fast transfers on backup and provides room for future expansion beyond the suggested minimum of 512MB by unRAID. To streamline the process during testing cycles, I used a condensed fdisk (man) command combined with echo to automate the interactive prompts in a single one-liner:
p\n- Print the current partition table (should be empty).o\n- Create a new MSDOS MBR partition table.n\n- Create a new partition.\n\n\n\n- Just sticking with new partition defaults.t\nc- Set partition type toc(W95 FAT32).a\n- Set partition bootable.p\n- Print new partition table.w\n- Write changes and quit.
After creating the partition, I assigned the image to a loopback device for formatting and mounting.
# Create and partition image
dd if=/dev/zero of=unraid-usb.img bs=1M count=$[1024*2] status=progress
echo -e "p\no\nn\n\n\n\n\nt\nc\na\np\nw\n" | fdisk unraid-usb.img

# Get available loop device
LOOPD_NAME=$(losetup -f)
LOOPP_NAME="${LOOPD_NAME}p1"

# Setup loop device, format to FAT32 and mount.
losetup -P $LOOPD_NAME unraid-usb.img
mkfs.vfat -F32 -nUNRAID $LOOPP_NAME
mount $LOOPP_NAME temp
Once the loopback device was mounted, I extracted the unRAID zip file to it. I also renamed the EFI- directory to EFI to allow UEFI booting if needed. In addition, I copied the ldlinux.c32 file to the root directory, which was missing, and led to boot errors.
# Extract the unraid files to the image partition
# enable booting with EFI and move a required syslinux
# file to the root directory.
unzip unRAIDServer*zip -d temp
mv temp/EFI- temp/EFI
cp temp/syslinux/ldlinux.c32 temp/ldlinux.c32
For completeness, I’m providing here a few commands that can be used to modify basic configurations of the unRAID installation. Although I did not make these changes initially, it’s worth noting that they can be adjusted since the filesystem is already mounted:
# Optional: Static network configuration (if no DHCP).
# DNS_SERVER1 parameter does not exist in the file by default
# Took a testing round to figure this one out.
sed -i "s/USE_DHCP=\"yes\"/USE_DHCP=\"no\"/" temp/config/network.cfg    # Disable DHCP
sed  "s/IPADDR=/IPADDR=\"172.16.3.20\"/" temp/config/network.cfg        # Set static IP
sed -i "s/NETMASK=/NETMASK=\"255.255.255.0\"/" temp/config/network.cfg  # Set mask
sed -i "s/GATEWAY=/GATEWAY=\"172.16.3.254\"/" temp/config/network.cfg   # Set default GW
echo DNS_SERVER1=\"172.16.3.254\" >> temp/config/network.cfg            # Set DNS server
Before unmounting the new image, the last step was to copy the syslinux folder from the mounted partition, this directory contains the mbr.bin and syslinux_linux executable files that are used to create the bootable image. Initially, I used the syslinux executable installed on my machine through the package manager. However, despite the small difference in versions (only a minor patchlevel change), I encountered booting errors. Therefore, it’s necessary to copy the appropriate syslinux files that are supplied with the unRAID zip file.
# Prepare the drive for syslinux install (unmout, unloop).
cp -av temp/syslinux ./syslinux
umount temp
losetup -d $LOOPD_NAME
After unmounting the image and releasing it from the loopback device, I used the syslinux utility to add the syslinux VBR to the image, It’s worth noting that I used the -t flag and gave syslinux the offset to the first partition in the file instead of running it on the /dev/loopXp1 before I executed losetup -d in the previous step. This approach is crucial because syslinux performs IOCTLs on the device which are not supported and result in possible errors. The offset is calculated as 2048*512 since the default start sector of the partition when partitioning with fdisk is 2048 and the sector size is 512.
Once the VBR is written, only the MBR remains to be written, the syslinux/mbr.bin file is only 440 bytes long so it will not overwrite the partition table of the image MBR, only the boot code. It’s essential to include the conv=notrunc option for dd (man) as without this dd will truncate the file (to 0 bytes) and then copy the data, overwriting the entire image file I created with a new file 440 bytes long, deleting the rest of the content.
# requires mtools (apt install mtools)
./syslinux/syslinux_linux -ift $[2048*512] unraid-usb.img
dd if=./syslinux/mbr.bin of=unraid-usb.img conv=notrunc
And that concludes the process! I successfully obtained a suitable backing file to use with the USB storage gadget. As a final test, I booted the device as a regular disk in QEMU with the command qemu-system-x86_64 -m 4096 -smp 2 -enable-kvm -hda unraid-usb.img. Once I observed the loading of the /bzroot file I stopped the machine, as this was enough to confirm that the disk is, at the very least, bootable in legacy mode. This test ensures that the image is functioning as expected (for now).
The USB gadget API and my setup
The Linux USB gadget API is a framework that enables Linux systems to act as USB peripherals or gadgets. It provides the ability to emulate various USB devices such as HID devices (keyboard, mouse, etc.), network interface controllers (NICs), serial devices, and most importantly, mass storage devices (which include USB flash drives).
Using gadgets, a Linux system can function as a USB device rather than just a USB host. To utilize the gadget API, a UDC (USB Device Controller) is required. The UDC is responsible for handling low-level communication with the USB host from the device side. For most traditional hosts like laptops and desktops, a UDC is unavailable since they are typically designed to function as USB hosts rather than devices. (Not taking into account popular SBCs such as the Raspberry Pi, Odroid, and more with a built-in UDC).
In the case of my server, a physical UDC is not available, even if it were, it wouldn’t serve the purpose of keeping everything in the realm of software as it would expose the gadget on a hardware interface. To overcome this limitation, I will employ another kernel module named dummy_hcd. This module creates a simulated UDC, and this simulated UDC will act as a loopback for the gadget, exposing it as a device within the host system.
CAUTION: Note that the
dummy_hcdmodule is intended for testing gadgets and debugging purposes rather than production use. It may exhibit stability and performance issues. Use at your own risk. Discretion is advised. More about performance issues can be found in the last chapter.
Preparing the gadget API on the hypervisor
There are two generic methods for creating gadgets with the gadget API without setting up everything from scratch, and both will require the dummy_hcd and other kernel modules. Initially, I didn’t anticipate that Proxmox would include these modules in its installed kernel, as it’s not a common expectation for a serious hypervisor to act as a USB device. However, to my surprise, most of the required modules were present, the only module missing was the dummy_hcd module, which would provide the loopback functionality, this is understandable as it’s intended solely for testing and debugging purposes. To obtain the dummy UDC module, I will need to compile it myself.
To avoid affecting my “production” server, I decided to set up a virtual machine with an identical version of Proxmox (v7.4) on it. This virtual machine will serve as a dedicated environment for compiling and testing the required module before doing tests on real hardware, on my production Proxmox node. By doing so, I can ensure that my production server remains unaffected during the process and my home services sta y uninterrupted.
After installing Proxmox on a VM, I took the necessary precautions to ensure a hassle-free and streamlined process. I commented out the pve-enterprise repository in /etc/apt/sources.list.d/pve-enterprise.list as this requires a payed subscription to Proxmox (which I don’t have) and instead, I added the pve-no-subscription repository to the /etc/apt/sources.list file. This adjustment allows me to update my system, ensuring that it is in sync with my production server (see Proxmoxs package repositories).
apt update && apt upgrade -y
Next, I proceeded to install the necessary tools required for kernel compilation. While not all of these tools may be essential, I use my default command that covers the common requirements for a kernel build in a Debian-like distro. Additionally, I made sure to install the pve-headers-$(uname -r) package instead of the standard linux-headers-$(uname -r) to get the most up-to-date headers for the running kernel. These Proxmox-specific headers are crucial for the compilation process, ensuring compatibility with my Proxmox environment.
apt install -y libncurses-dev gawk flex bison openssl libssl-dev dkms libelf-dev libudev-dev libpci-dev libiberty-dev autoconf llvm git pve-headers-$(uname -r)
Once the system was up to date, I began by downloading the Proxmox kernel sources. After cloning the repository, it’s essential to verify the current kernel version and switch to the appropriate branch accordingly. Checking the latest commit message that corresponds to the current kernel version is also recommended, as I ran an update beforehand and might need a reboot.
git clone git://git.proxmox.com/git/pve-kernel.git
Additionally, the submodules within the repository should be updated. This step is necessary to download the appropriate upstream kernel. Once done, all that is left is to enter the kernels directory (submodules/ubuntu-kernel) and everything is set for the standard kernel module compilation process.
cd pve-kernel
make submodule
The next step involves copying the current kernel configuration from the /boot directory. This configuration file serves as a basis for the new kernel build. Additionally, the Module.symvers file, which contains the exported symbols of the current kernel, is symbolically linked to the kernel’s source directory, this file is used during the MODPOST step to check the availability of various kernel symbols.
cd submodules/ubuntu-kernerl
cp /boot/config-$(uname -r) ./.config
ln -s /usr/lib/modules/$(uname -r)/build/Module.symvers ./
To reflect the correct local version so that the vermagic matches properly, I updated the CONFIG_LOCALVERSION entry in the configuration file. Furthermore, to prevent the kernel build system from appending a + symbol to the veragic (which occurs when there are changes that were not committed to git), I created a .scmversion file that prevents that from happening.
LVER="-$(grep -m1 "KREL=" /root/pve-kernel/Makefile | cut -d\= -f2)-pve"; sed -i "s/CONFIG_LOCALVERSION=\"\"/CONFIG_LOCALVERSION=\"$LVER\"/" .config
touch .scmversion
With the preparations complete, the dummy UDC can now be enabled in the configuration. This is done by setting CONFIG_DUMMY_HCD to m, indicating that it will be built as a loadable module.
sed -ir 's/#.CONFIG_USB_DUMMY_HCD.*/CONFIG_USB_DUMMY_HCD=m/' .config
With everything set up, it’s time to initiate the compilation process. Firstly, the build system needs to be prepared to build external modules. This is done by executing the modules_prepare target.
Next, the UDC module is specifically built by passing the directory of the module to the build system using the M= option. During the compilation process, the build system might prompt for additional configuration options that were modified or added. In such cases, I typically choose to keep these options at their default settings, do as you like.
make modules_prepare -j4
make -j4 M=drivers/usb/gadget/udc
If the compilation process is successful, the newly built module should be located at ./drivers/usb/gadget/udc/dummy_hcd.ko. To verify the module information and compatibility with the current kernel, I used the modinfo command on both the built-in module (e.g., udc-core) and the dummy_hcd module. By comparing the modversion field of both modules, I confirmed that they match, indicating compatibility with the current kernel.
modinfo drivers/usb/gadget/udc/dummy_hcd.ko

#filename:       /root/pve-kernel/submodules/ubuntu-kernel/drivers/usb/gadget/udc/dummy_hcd.ko
#license:        GPL
#author:         David Brownell
#description:    USB Host+Gadget Emulator
#srcversion:     36B0F76D112C193C249FAFF
#depends:        udc-core
#retpoline:      Y
#name:           dummy_hcd
#vermagic:       5.15.107-2-pve SMP mod_unload modversions
#parm:           is_super_speed:true to simulate SuperSpeed connection (bool)
#parm:           is_high_speed:true to simulate HighSpeed connection (bool)
#parm:           num:number of emulated controllers (uint)
modinfo udc-core

#filename:       /lib/modules/5.15.107-2-pve/kernel/drivers/usb/gadget/udc/udc-core.ko
#license:        GPL v2
#author:         Felipe Balbi <balbi@ti.com>
#description:    UDC Framework
#srcversion:     AFA420B6C96C9BFEA38D048
#depends:
#retpoline:      Y
#intree:         Y
#name:           udc_core
#vermagic:       5.15.107-2-pve SMP mod_unload modversions
To install the new module in the system, the module needs to be copied to the appropriate location where all kernel modules reside. Once the module is copied, I ran the depmod (man) command to regenerate the kernel module dependency file. This step ensures that I don’t have to manually insert the udc-core module before inserting dummy_hcd.ko.
cp drivers/usb/gadget/udc/dummy_hcd.ko /lib/modules/$(uname -r)/kernel/drivers/usb/gadget/udc
depmod
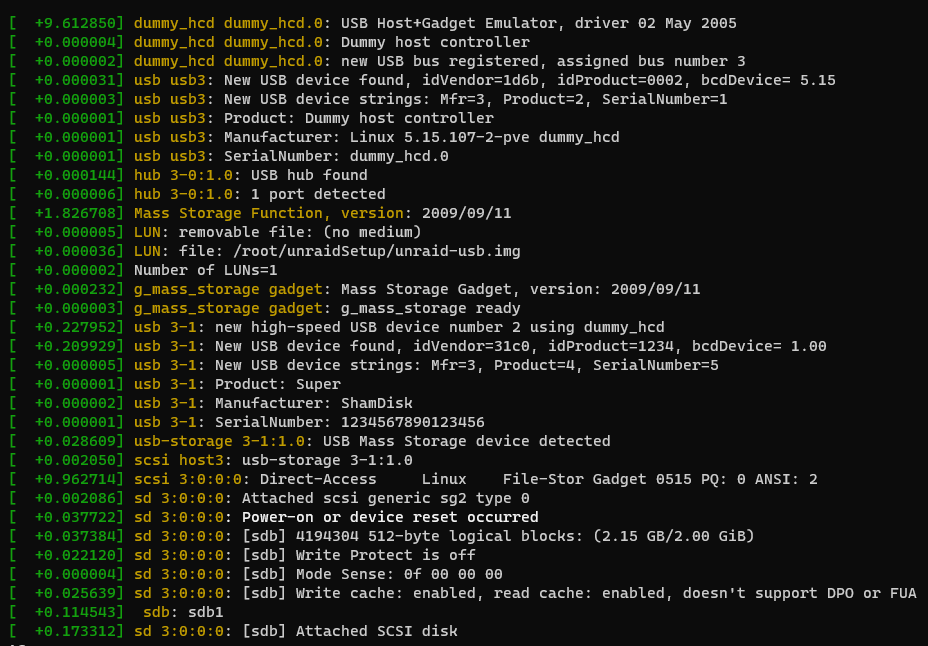
I then used dmesg -Hw command in another terminal to monitor the system messages and proceeded to insert the new module. If all the previous steps were executed correctly, I should see the system registering a new USB bus in the system messages shown by dmesg and indeed I did, I did not bother with setting any parameters, as the dummy UDC will be created by default using USB version 2. It’s always nice that everything goes smoothly.
modprobe dummy_hcd
dmesg
#...
#[May23 00:56] dummy_hcd dummy_hcd.0: USB Host+Gadget Emulator, driver 02 May 2005
#[  +0.000004] dummy_hcd dummy_hcd.0: Dummy host controller
#[  +0.000002] dummy_hcd dummy_hcd.0: new USB bus registered, assigned bus number 3
#[  +0.000028] usb usb3: New USB device found, idVendor=1d6b, idProduct=0002, bcdDevice= 5.15
#[  +0.000003] usb usb3: New USB device strings: Mfr=3, Product=2, SerialNumber=1
#[  +0.000001] usb usb3: Product: Dummy host controller
#[  +0.000001] usb usb3: Manufacturer: Linux 5.15.107-2-pve dummy_hcd
#[  +0.000001] usb usb3: SerialNumber: dummy_hcd.0
#[  +0.000219] hub 3-0:1.0: USB hub found
#[  +0.000005] hub 3-0:1.0: 1 port detected
It’s time to create gadgets
There are two ways I could create mass-storage gadgets. The first one is by using the basic legacy g_mass_storage module, which is included with the current kernel. This approach is simple and works well, and it’s the first approach I tried.
The g_mass_storage module requires some parameters to be passed to it upon loading, which contains basic information about the device. The important ones are:
| Name | Description | Value I used | Notes |
|---|---|---|---|
| idVendor | USB vendor ID | 0x31c0 | Generic mass-storage ID |
| idProduct | USB product ID | 0x1234 | Generic mass-storage ID |
| iSerialNumber | Device serial number | “1234567890123456” | Cannot be 0s (see later on) |
| iManufacturer | Manufacturer name | “ShamDisk” | String |
| iProduct | Product name | “Super” | String |
| file | Backing file | [path to backing file] | Path |
Before inserting the module, I made sure the dummy HCD module was loaded, and only then added the gadget:
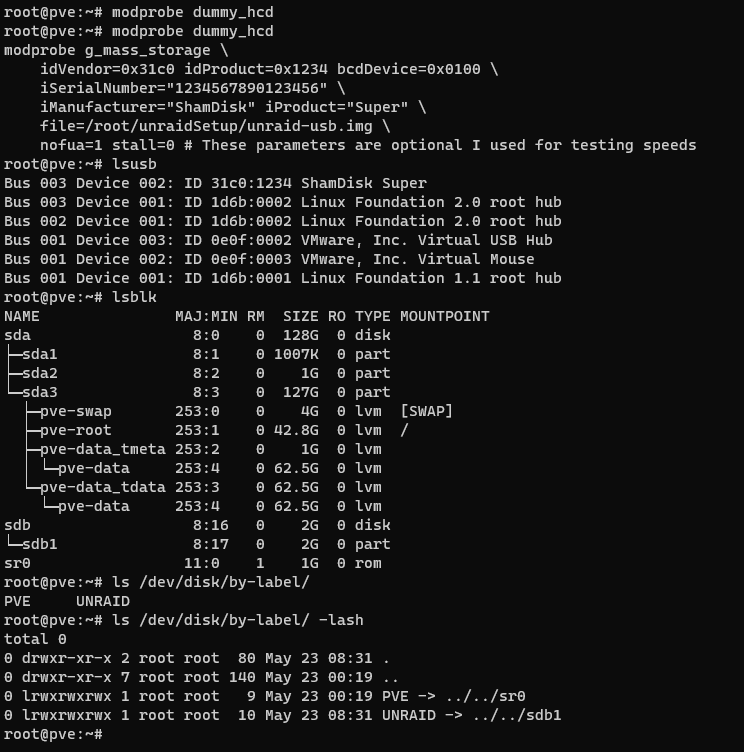
modprobe dummy_hcd
modprobe g_mass_storage \
    idVendor=0x31c0 idProduct=0x1234 bcdDevice=0x0100 \
    iSerialNumber="1234567890123456" \
    iManufacturer="ShamDisk" iProduct="Super" \
    file=/root/unraidSetup/unraid-usb.img \
    nofua=1 stall=0 # These parameters are optional; I used them for testing speeds
Once done, I checked dmesg to verify if the emulated device was loaded and visible in the lsusb output. I also checked if a new volume appeared with the name “UNRAID” that I set as the label for the partition using mkfs.vfat.
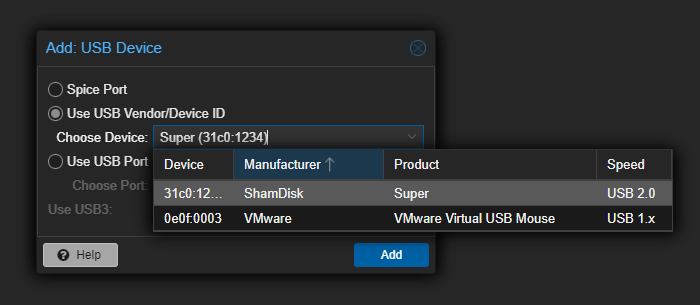
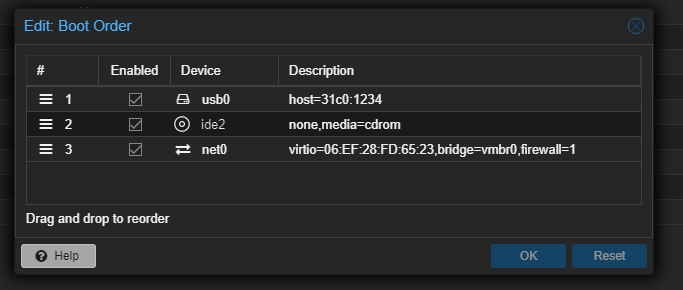
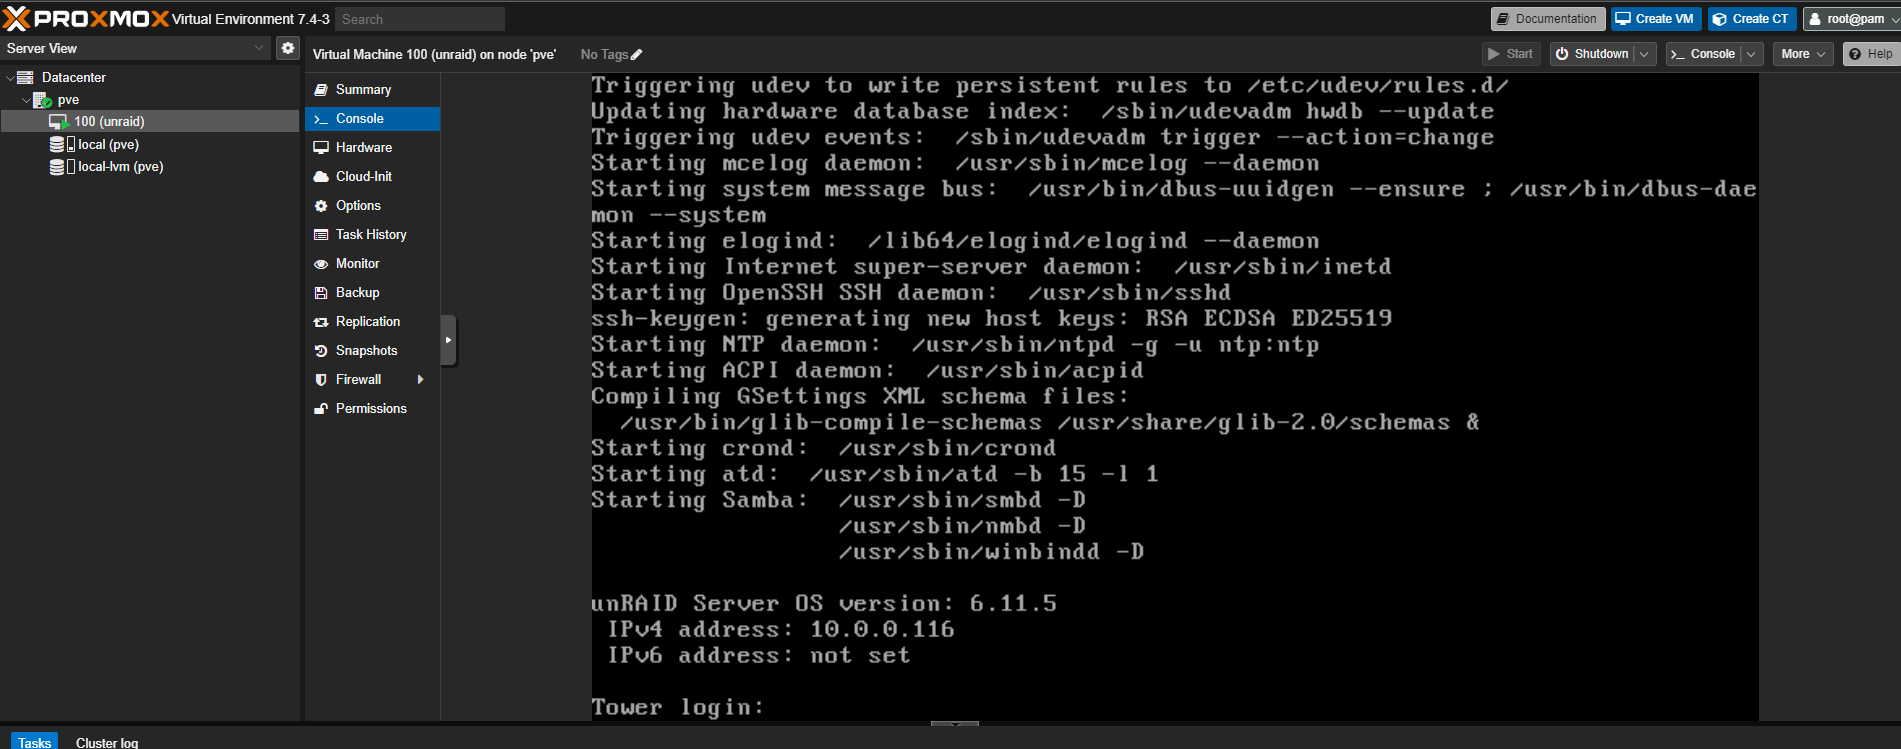
Now it was time to see if the gadget works. I created a new virtual machine in Proxmox and assigned it some basic resources in the initial configuration. After saving the configuration, I went to the Hardware page and added a new USB device. Fortunately, the gadget I created appeared there in the drop-down list. I added the device to the machine as a VID/PID filter, then, I navigated to the Options page and enabled USB booting under the Boot Order, ensuring that it was set as the first device to boot.
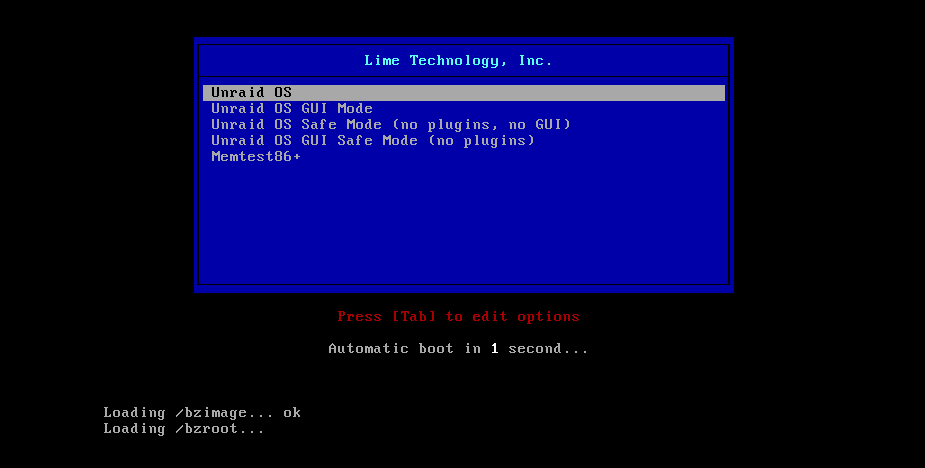
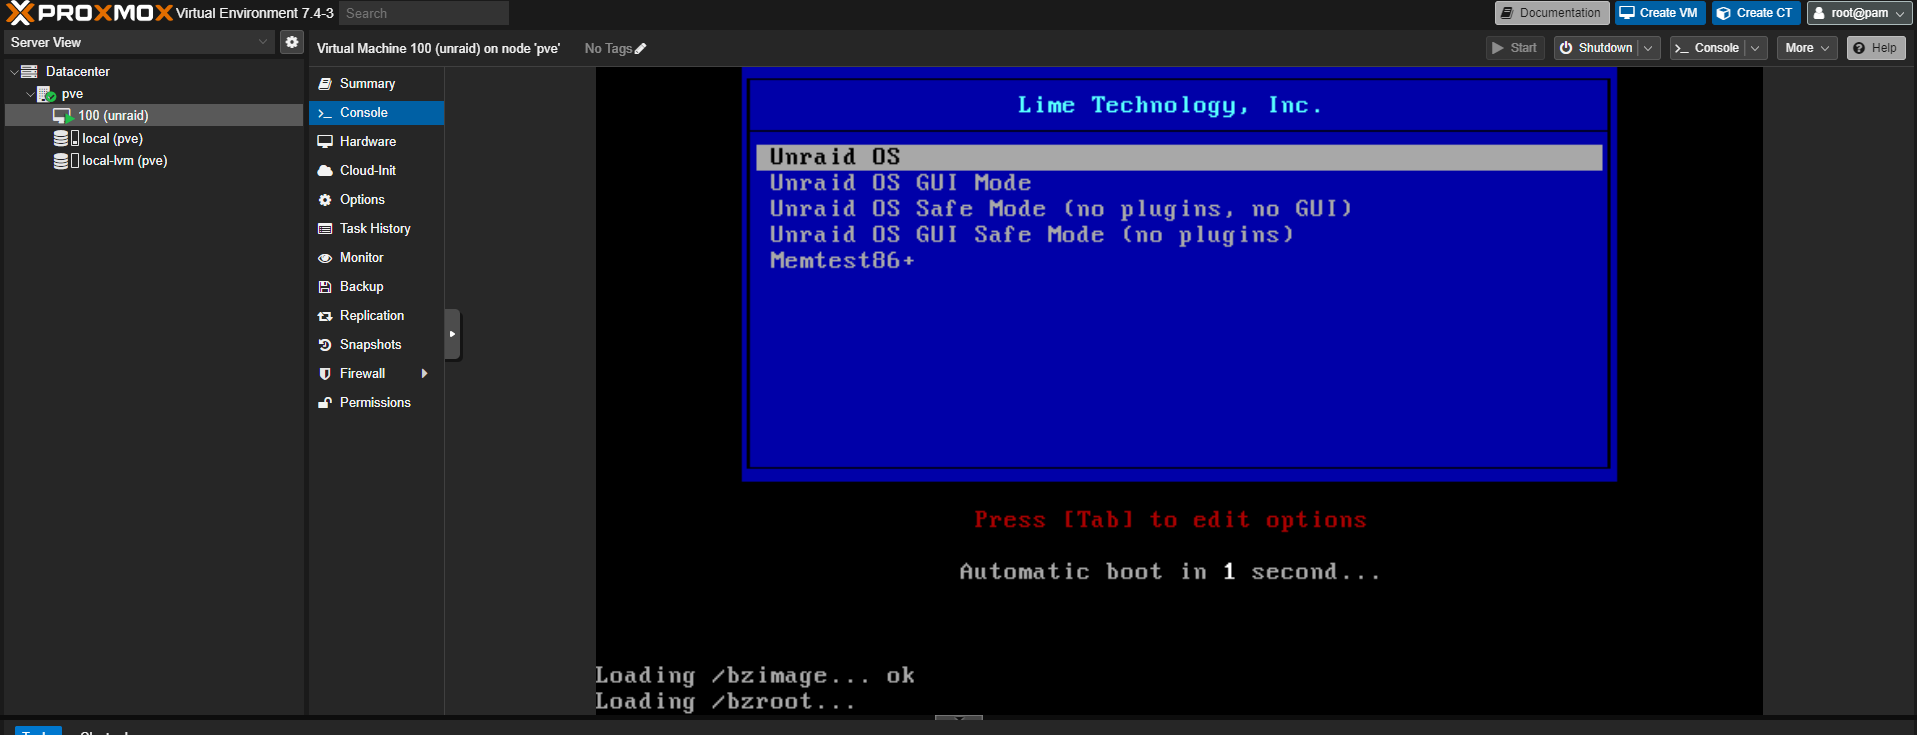
Now comes the real test, powering on the machine. To my delight, the first test passed successfully, and the unRAID boot screen appeared. Given that I was booting unRAID on a VM, which itself was running on a VM on top of another hypervisor (and other problems I will explain in the last chapter), I expected the boot process to be lengthy, probably taking over 5 minutes just for the initial bootloader file copy. However, to my surprise, the initial boot process loading the ramdisk for unRAID only took 1 minute and 42 seconds (which was the minimum 5 minutes I was initially expecting), then unRAID itself booted in just 3 minutes and 39 seconds (which was much longer than I was expecting). I couldn’t believe it!
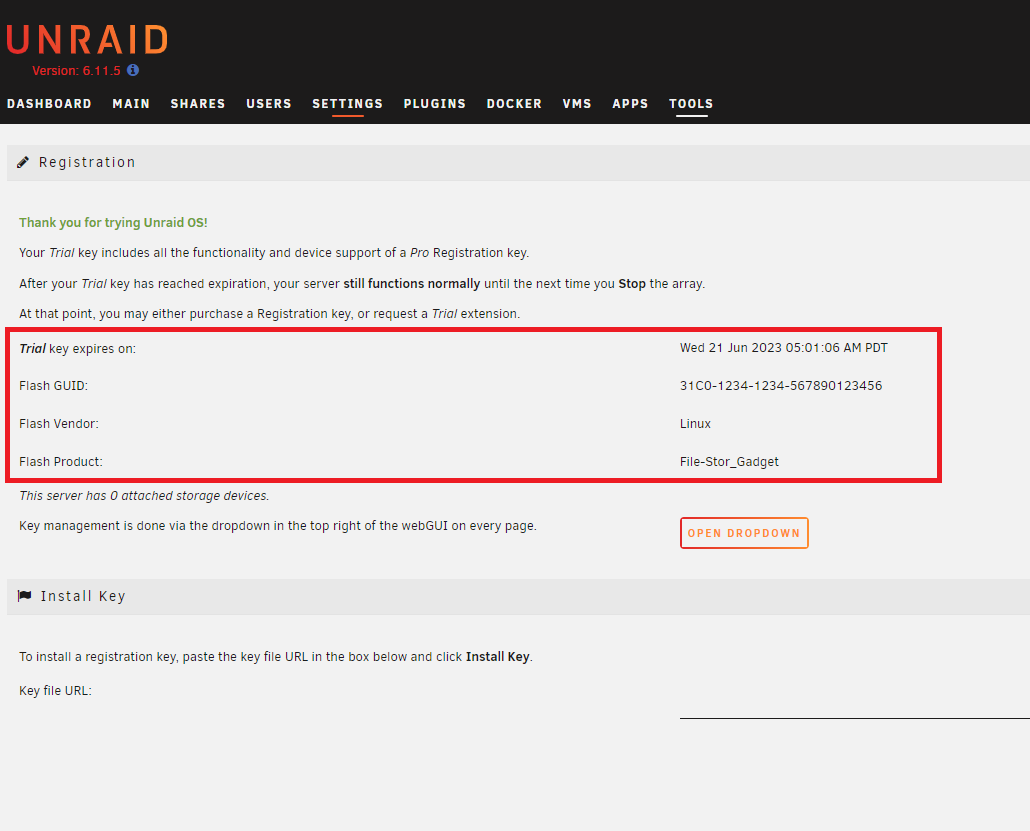
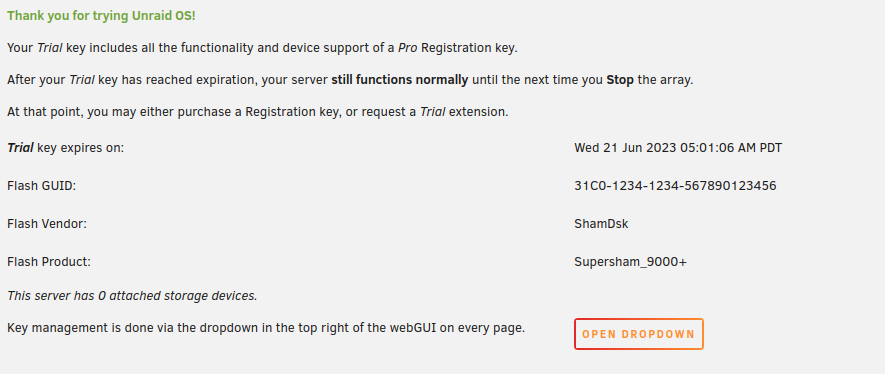
Once the machine was booted up, I accessed its internal IP through a web browser and logged in to the web UI, hoping it wouldn’t give me an error like WTF do you think you’re doing booting from a fake USB? To my relief, unRAID didn’t care. I proceeded to activate the trial license, and it was successful, despite the USB serial number being literally 1234567890123456.
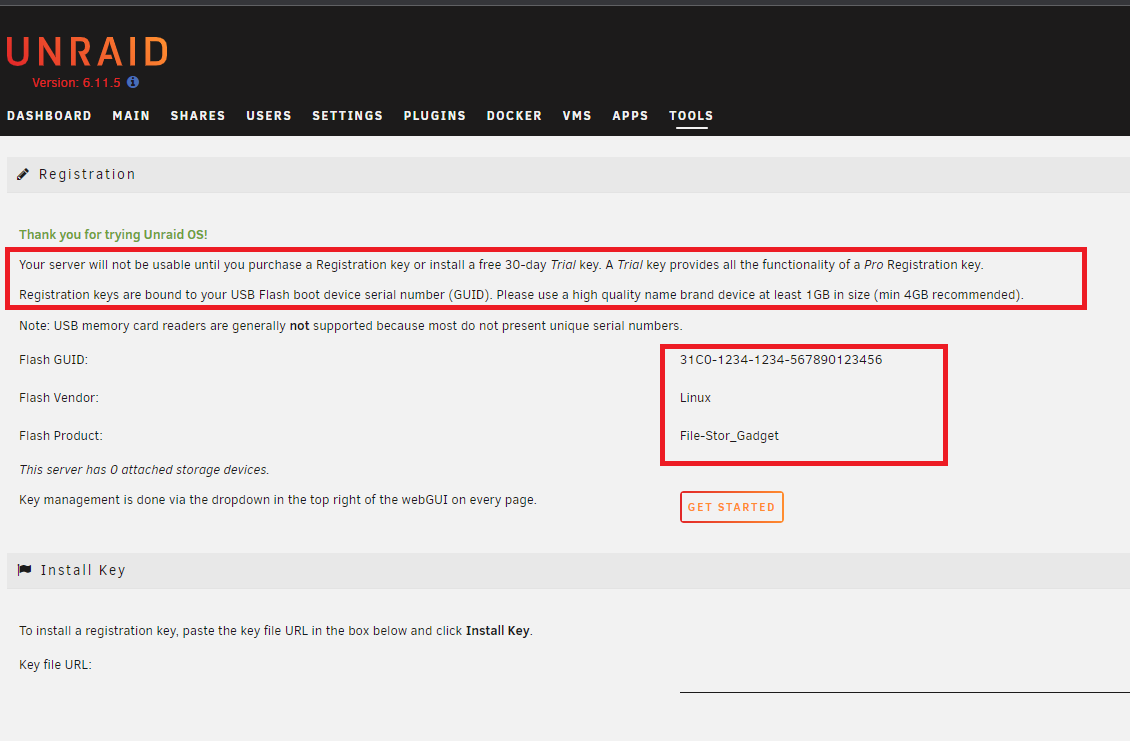
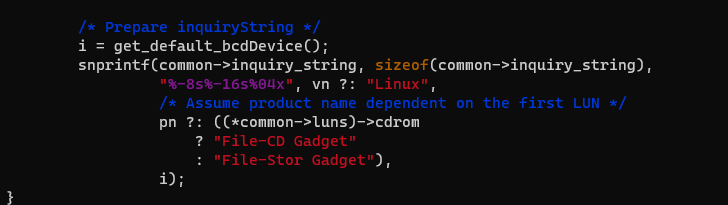
Observant readers might notice a slight discrepancy. While I set up the gadget with the vendor string ShamDisk and the product string Super, unRAID reports Linux and File-Stor_Gadget as the vendor/product. This perplexed me. After going back and reading the dmesg strings from my testing, I noticed that indeed the vendor and product strings appear, however, they are not part of the USB strings configuration. Interestingly, it appears hat the vendor and product strings reported by unRAID are from a different layer of the gadget. Enter SCSI.
It appears that unRAID takes the identity strings from the SCSI inquiry report and not from the USB device itself. The strings returned are the default strings set in the usb_f_mass_storage module (drivers/usb/gadget/function/f_mass_storage.c) which is used by g_mass_storage. Unfortunately, by using g_mass_storage, there is no way to change these strings since the module does not expose any such interface/parameter.

It’s not that this affects the functionality of the unRAID VM (as long as the unRAID team doesn’t crack down on emulated USB devices containing the string File-Stor_Gadget), but I wanted to change it to show something else, for run.
This is where the second method of creating the gadget comes into play. Creating the mass storage gadget manually, without relying on the g_mass_storage module. This provides a higher level of flexibility and customization options. By taking this approach, I have more control over the gadget’s configuration and settings, however, it’s important to note that manually configuring the USB gadget requires a deeper understanding of USB and the gadget framework. It involves configuring the gadget using lower-level interfaces, such as libcomposite and configfs, but do not fret, it’s not as bad as using a raw gadget.
A USB device exposes a descriptor that is split into configurations, interfaces, and endpoints. Endpoints are used by interfaces to communicate with the driver. Interfaces are grouped into configurations, and a device might have multiple configurations. Additionally, there is a special ep0 (endpoint 0) that must exist and resides outside the configurations, This endpoint is used for the device setup and enumeration process. You can find further information about this process (here).
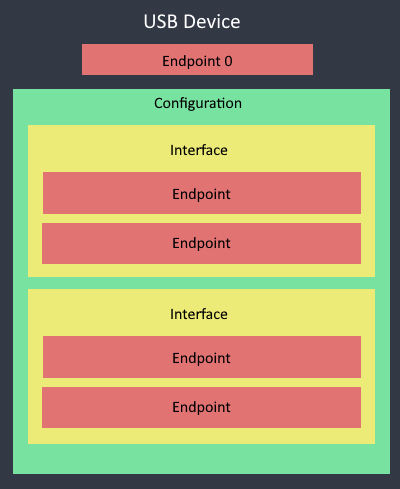
In my case, I need to create a gadget (device) that will have a single configuration containing the mass storage interface. To achieve this, I will utilize the usb_f_mass_storage functions. This approach was chosen because the gadget API handles the setup of endpoints and basic interface configuration.
I began by loading the dummy_hcd, libcomposite, and the usb_f_mass_storage gadget interface into the kernel.
modprobe dummy_hcd
modprobe usb_f_mass_storage	# Autoloads libcomposite
Once loaded, a new gadget config interface becomes available under /sys/kernel/config/usb_gadget/, this is where all the gadget magic happens. I created a new gadget with mkdir unraid. Upon creation, the kernel will populate the directory with pseudo-files for gadget configuration. Similar to the configuration process with g_mass_storage, I set up the VID and PID (idVendor and idProduct). However, I also configured the bcdDevice entry which defines the USB device revision number (0x0100 for 1.0.0), and bcdUSB which defines the protocol version the device uses (0x0200 for USB 2.0).
cd /sys/kernel/config/usb_gadget/
mkdir unraid
cd unraid

echo 0x31c0 > idVendor
echo 0x1234 > idProduct
echo 0x0100 > bcdDevice
echo 0x0200 > bcdUSB
To add the manufacturer and product strings (iManufacturer, iProduct, and iSerial in the g_mass_storage module), I created a new directory under strings named 0x409. The choice of the name 0x409 is not random, it corresponds to the USB LANGID code for English US. Similar to the initial gadget directory, the kernel will populate the strings/0x409 directory with configurable pseudo-files.
mkdir strings/0x409

echo "ShamDisk" > strings/0x409/manufacturer
echo "Super" > strings/0x409/product
echo "1234567890123456" > strings/0x409/serialnumber
With the basic device set up, I proceeded to create a configuration. In this case, there was no need to configure anything special. The only requirement was to ensure that at least one configuration existed for the interface, as mandated by the USB standard.
mkdir configs/c.1
The final step is to create the mass-storage interface. This interface can be created within the functions directory. Next, the default LUN](https://en.wikipedia.org/wiki/Logical_unit_number) is configured to use the unRAID USB backing file. This is also where I get to control the device information returned by the SCSI inquiry command. The pseudo-file responsible for storing this information is appropriately named inquiry_string. The inquiry string to be set must be 28 bytes long and follow a specific format, which is as follows:
- 8 bytes: Manufacturer name
- 16 bytes: Product name,
- 4 bytes: Revision number
To differentiate the inquiry string from the USB strings, I have decided to use a similar but different string compared to the one I used previously.
mkdir functions/mass_storage.usb0
echo /root/unraidSetup/unraid-usb.img > functions/mass_storage.usb0/lun.0/file
echo "ShamDsk Supersham 9000+ XXYY" > functions/mass_storage.usb0/lun.0/inquiry_string
As USB interfaces are grouped into configurations, I linked the interface directory to the earlier created configuration directory. Following that, I manually added the new gadget to the dummy UDC , as this step does not occur automatically. Once the UDC is set, the drive should appear on the host.
ln -s functions/mass_storage.usb0 configs/c.1
ls /sys/class/udc > UDC

After rebooting the Proxmox machine, I verified on registration page and confirmed that the vendor and product names had indeed changed to the ones I provided in the inquiry_srting pseudo-file.
From a quick glance, it seems that a physical and emulated virtual device are identical, it might even be somewhat tue on the USB layer. However, apart from the inquiry data, there are many differences between the emulated mass-storage devices. For example:
- The gadget only supports SCSI version 2, while a real flash drive would present SPC-4 or as UAS.
- The gadget MODE SENSE reply is fixed and does not reflect a real device.
- Caching is enabled by default on read and write
Querying real and emulated devices with the sg_* tools can highlight the differences between the two. The more true the emulated device needs to be to the read world, the more the need groes tocreate a custom gadget from scratch. More information about the SCSI protocol can be found here.
Closing notes
Autobooting:
You might be wondering what happens if the hypervisor reboots, the answer is that the gadget will disappear. However, there are ways to address this issue. The first approach is to use modprobe.d to autoload the necessary modules during boot. The second approach involves utilizing Proxmox’s hook scripts. These hook scripts execute at different phases of the VM’s lifecycle, allowing for the automation of module loading during the pre-start phase and unloading during the post-stop phase. This ensures that the gadget is only loaded when the VM is in use.
Also, for the second method of using gadgets I write about, the tool gt can be used to make the creation streamlined (https://github.com/linux-usb-gadgets/gt).
Selecting a serial number:
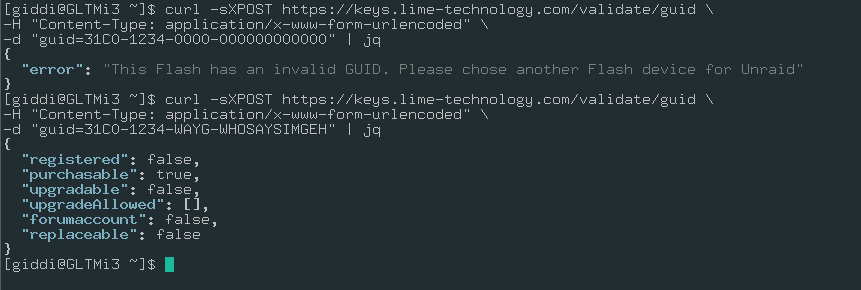
If you are considering using this method to boot unRAID (no warranty, pay for a license, blah blah blah), it is advisable to select a proper GUID for your emulated device. According to the license screen in the unRAID web UI, the GUID follows the format VID-PID-SERIAL[0..4]-SERIAL[4..16]. I recommend using a random 16-character string instead of filling it with a predictable pattern like (12345..., AAAA..). If you want to check if a GUID is valid and “purchasable” you can use the command curl -sXPOST https://keys.lime-technology.com/validate/guid -H "Content-Type: application/x-www-form-urlencoded" -d "guid=<GUID>" (ensure the GUID is in uppercase).
Piracy and Countermesaures:
I would like to extend my best wishes to Lime Technology and the unRAID team. However, I must express my dissatisfaction with the licensing model that requires a USB drive, it is inconvenient. While it might be possible to pirate unRAID by rebooting the VM every 30 days and setting a new trial license (assuming configurations can be restored), I want to emphasize that my intention was not to promote piracy but rather to seek convenience. I haven’t been deeply involved in the unRAID community, as my initial involvement was purely for testing purposes which took me down a rabbit hole of fun. Therefore, I don’t have a good understanding of how the unRAID team might respond to such actions. They may choose to ignore it, implement additional tests and checks for licenses, or maybe even delete all your data if the string File-Stor Gadget is returned from a SCSI inquiry. To be frank, I don’t care, this cat-and-mouse game has existed in the software industry since its inception. It was never about piracy, it was about convenience.

Addendum: USB gadget performance issues and fixes
I mentioned throughout the post that the dummy_hcd module is not suitable for production work due to its drawbacks in terms of stability and speed.
Stability Concerns: From a stability standpoint, there are two types of issues. If the stability problems only affect the USB gadget, it shouldn’t be a significant problem since the unRAID VM runs from a ramdisk. However, it might impact configuration changes and reboots. The more severe instability would occur if the dummy UCD affects the entire USB subsystem or crashes the kernel. This could cause issues for other VMs running on the server, potentially leading to misbehavior or even crashing of the hypervisor due to real USB devices such as RF dongles.
Speed Issues: The dummy UDC is known for being very slow. While this may not be a concern during testing, it can become an issue in production. As the unRAID VM runs from a ramdisk, the speed primarily affects boot time, configuration changes, and backups.
However, I’m not overly worried about these issues. The server doesn’t boot frequently, configuration changes are minimal, and there’s no need to read or back up directly from the flash drive gadget itself since it’s just an image on the host and can be easily copied out.
I did some exploration to address the speed issues for fun after getting everything working. By testing the gadget on real hardware (an Odroid N2+), I discovered that the dummy UDC was causing the speed problems. This led me to the Linux kernel mailing list archive, where I found a thread by Pantelis Koukousoulas from 9 years ago attempting to address the issue. Although a patch was submitted, it was never integrated into the kernel.
Considering the significant changes that occur in the kernel over 9 years, the suggested patch in the thread was not compatible with the current Proxmox kernel version (5.15.107). However, since the creator highlighted the exact problem with the module and the patch, I was able to quickly create an updated version of the patch for testing purposes.
The root problem lies in the fact that the original module developer used timers based on jiffies, which are kernel units of time or clock “ticks.” One downside of jiffies is that they are configurable. The kernel configuration option CONFIG_HZ determines the number of jiffies in a second. According to the module developer’s documentation, an HZ value of 1000 is expected, meaning there are 1000 jiffies in a second.
/* FIXME if HZ != 1000 this will probably misbehave ... */
Examining the current kernel configuration, the HZ value is set to 250, while the actual running HZ value is 100. This indicates that the performance of the current gadget utilizing the dummy UDC is, at best, four times slower than intended. However, currently, the performance is even worse, with it being approximately ten times slower than the expected speed.
cat /boot/config-$(uname -r) | grep CONFIG_HZ=
#CONFIG_HZ=250

#
getconf CLK_TCK
#100
To address the issue caused by the lower HZ value in the running kernel, the solution is to utilize a different kernel timer. The recommended approach, as implemented in the original patch and my rework, is to use the kernel’s high-resolution timers (hrtimer). Instead of relying on jiffies, the hrtimer provides a consistent timer across different HZ values.
In summary, the patch replaces the original timer with a hrtimer. Whenever the original module intended to sleep for 1 jiffie (equivalent to 1/1000 of a second or 1ms), the hrtimer sleeps for the correct amount of time.
The table below illustrates the performance improvements achieved by applying this fix on both physical and virtual hardware. One of the metrics, “unRAID RD Copy,” estimates the time required to copy the content of the unRAID flash drive to memory (Loading /bzXXXXXX...). The tests were performed using dd from and to the gadget using a block size of 1MB and a count of 100 blocks for a complete 100MB copy. Each test was performed 4 times. In between the read and write tests, I flushed the kernel caches with echo 1 > /proc/sys/vm/drop_caches, and between test cycles, I reloaded all relevant modules.
Please note that the specific values for the “Patched” rows will depend on your hardware configuration. If you would like to try the patch yourself, I have created a patchfile which you can find below. Feel free to use this patchfile and apply it to your system to experience the performance changes firsthand.
| Environment | UDC Mode | Patched | Read (~) | Write (~) | unRAID RD Copy |
|---|---|---|---|---|---|
| Gadget on Proxmox VM | High Speed | No | 950 kB/s | 750 kB/s | 5.5 Min |
| Gadget on Proxmox VM | Super Speed | No | 1.0 MB/s | 950 kB/s | 5 Min |
| Gadget on Proxmox VM | High Speed | Yes | 7.5 MB/s | 6.7 MB/s | 40 Sec |
| Gadget on Proxmox VM | Super Speed | Yes | 6.4 MB/s | 5.0 MB/s | 46 Sec |
| Gadget on physical HW | High Speed | No | 1.7 MB/s | 1.9 MB/s | 56 Sec |
| Gadget on physical HW | Super Speed | No | 1.7 MB/s | 1.9 MB/s | 56 Sec |
| Gadget on physical HW | High Speed | Yes | 13.1 MB/s | 16.3 MB/s | 22 Sec |
| Gadget on physical HW | Super Speed | Yes | 13.1 MB/s | 16.3 MB/s | 22 Sec |
From 5e3e576ef31385cf1d115f1f5ed7c825d7884af5 Mon Sep 17 00:00:00 2001
Message-Id: <5e3e576ef31385cf1d115f1f5ed7c825d7884af5.1684846827.git.giddi@pve.test@giddi.net>
From: Giddi <pve.test@giddi.net>
Date: Tue, 23 May 2023 03:27:30 -0900
Subject: [PATCH 1/1] usb: gadget: udc: dummy_hcd: Use hrtimers for better
 performance

---
 drivers/usb/gadget/udc/dummy_hcd.c | 35 ++++++++++++++++++------------
 1 file changed, 21 insertions(+), 14 deletions(-)

diff --git a/drivers/usb/gadget/udc/dummy_hcd.c b/drivers/usb/gadget/udc/dummy_hcd.c
index a2d956af42a2..ae2d4b6a0b5f 100644
--- a/drivers/usb/gadget/udc/dummy_hcd.c
+++ b/drivers/usb/gadget/udc/dummy_hcd.c
@@ -44,6 +44,8 @@
 #include <asm/irq.h>
 #include <asm/unaligned.h>

+#include <linux/hrtimer.h>
+
 #define DRIVER_DESC    "USB Host+Gadget Emulator"
 #define DRIVER_VERSION "02 May 2005"

@@ -240,7 +242,7 @@ enum dummy_rh_state {
 struct dummy_hcd {
        struct dummy                    *dum;
        enum dummy_rh_state             rh_state;
-       struct timer_list               timer;
+       struct hrtimer                  hrtimer;
        u32                             port_status;
        u32                             old_status;
        unsigned long                   re_timeout;
@@ -1301,8 +1303,8 @@ static int dummy_urb_enqueue(
                urb->error_count = 1;           /* mark as a new urb */

        /* kick the scheduler, it'll do the rest */
-       if (!timer_pending(&dum_hcd->timer))
-               mod_timer(&dum_hcd->timer, jiffies + 1);
+       if (!hrtimer_is_queued(&dum_hcd->hrtimer))
+               hrtimer_start(&dum_hcd->hrtimer, ms_to_ktime(1), HRTIMER_MODE_REL);

  done:
        spin_unlock_irqrestore(&dum_hcd->dum->lock, flags);
@@ -1322,8 +1324,9 @@ static int dummy_urb_dequeue(struct usb_hcd *hcd, struct urb *urb, int status)

        rc = usb_hcd_check_unlink_urb(hcd, urb, status);
        if (!rc && dum_hcd->rh_state != DUMMY_RH_RUNNING &&
-                       !list_empty(&dum_hcd->urbp_list))
-               mod_timer(&dum_hcd->timer, jiffies);
+                       !list_empty(&dum_hcd->urbp_list) &&
+                       !hrtimer_is_queued(&dum_hcd->hrtimer))
+               hrtimer_start(&dum_hcd->hrtimer, ms_to_ktime(100), HRTIMER_MODE_REL);

        spin_unlock_irqrestore(&dum_hcd->dum->lock, flags);
        return rc;
@@ -1777,9 +1780,9 @@ static int handle_control_request(struct dummy_hcd *dum_hcd, struct urb *urb,
  * drivers except that the callbacks are invoked from soft interrupt
  * context.
  */
-static void dummy_timer(struct timer_list *t)
+static enum hrtimer_restart dummy_timer(struct hrtimer *timer)
 {
-       struct dummy_hcd        *dum_hcd = from_timer(dum_hcd, t, timer);
+       struct dummy_hcd        *dum_hcd = container_of(timer, struct dummy_hcd, hrtimer);
        struct dummy            *dum = dum_hcd->dum;
        struct urbp             *urbp, *tmp;
        unsigned long           flags;
@@ -1808,8 +1811,6 @@ static void dummy_timer(struct timer_list *t)
                break;
        }

-       /* FIXME if HZ != 1000 this will probably misbehave ... */
-
        /* look at each urb queued by the host side driver */
        spin_lock_irqsave(&dum->lock, flags);

@@ -1817,7 +1818,7 @@ static void dummy_timer(struct timer_list *t)
                dev_err(dummy_dev(dum_hcd),
                                "timer fired with no URBs pending?\n");
                spin_unlock_irqrestore(&dum->lock, flags);
-               return;
+               goto out;
        }
        dum_hcd->next_frame_urbp = NULL;

@@ -1995,10 +1996,12 @@ static void dummy_timer(struct timer_list *t)
                dum_hcd->udev = NULL;
        } else if (dum_hcd->rh_state == DUMMY_RH_RUNNING) {
                /* want a 1 msec delay here */
-               mod_timer(&dum_hcd->timer, jiffies + msecs_to_jiffies(1));
+               hrtimer_start(&dum_hcd->hrtimer, ms_to_ktime(1), HRTIMER_MODE_REL);
        }

        spin_unlock_irqrestore(&dum->lock, flags);
+out:
+       return HRTIMER_NORESTART;
 }

 /*-------------------------------------------------------------------------*/
@@ -2387,7 +2390,7 @@ static int dummy_bus_resume(struct usb_hcd *hcd)
                dum_hcd->rh_state = DUMMY_RH_RUNNING;
                set_link_state(dum_hcd);
                if (!list_empty(&dum_hcd->urbp_list))
-                       mod_timer(&dum_hcd->timer, jiffies);
+                       hrtimer_start(&dum_hcd->hrtimer, ms_to_ktime(1), HRTIMER_MODE_REL);
                hcd->state = HC_STATE_RUNNING;
        }
        spin_unlock_irq(&dum_hcd->dum->lock);
@@ -2465,7 +2468,9 @@ static DEVICE_ATTR_RO(urbs);

 static int dummy_start_ss(struct dummy_hcd *dum_hcd)
 {
-       timer_setup(&dum_hcd->timer, dummy_timer, 0);
+       hrtimer_init(&dum_hcd->hrtimer, CLOCK_MONOTONIC, HRTIMER_MODE_ABS);
+       dum_hcd->hrtimer.function = dummy_timer;
+
        dum_hcd->rh_state = DUMMY_RH_RUNNING;
        dum_hcd->stream_en_ep = 0;
        INIT_LIST_HEAD(&dum_hcd->urbp_list);
@@ -2494,7 +2499,9 @@ static int dummy_start(struct usb_hcd *hcd)
                return dummy_start_ss(dum_hcd);

        spin_lock_init(&dum_hcd->dum->lock);
-       timer_setup(&dum_hcd->timer, dummy_timer, 0);
+       hrtimer_init(&dum_hcd->hrtimer, CLOCK_MONOTONIC, HRTIMER_MODE_ABS);
+       dum_hcd->hrtimer.function = dummy_timer;
+
        dum_hcd->rh_state = DUMMY_RH_RUNNING;

        INIT_LIST_HEAD(&dum_hcd->urbp_list);
--
2.30.2
P.S. I have decided not to use unRAID.